Wednesday, December 2, 2009

Christmas Craft Night...

Nothing says Christmas quite like Crafting ;)

Being that we're only 23 days away from Christmas, we thought a little holiday shindig complete with Mulled Cider, yummy treats, a gift exchange, and crafting ornaments would do just the trick for this months installment of Craft Night!! I think everyone will agree that our last craft night of the year was a complete success!

Below are some links to some of the ornaments we worked on....

Felt Christmas Ornaments
Felt Animal Ornaments
(No one really followed these patterns, but we made some adorable bird ornaments similar to these)
Beaded Snowflakes
Beaded Monograms
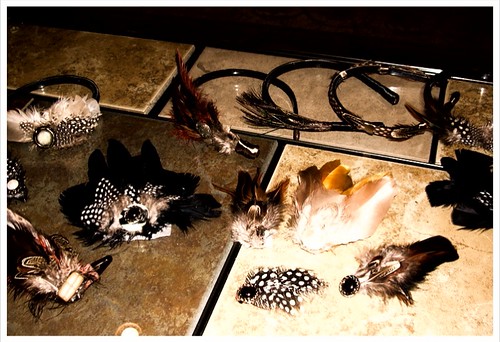
The beaded ornaments took a little finagling, but all in all I think everyone's ornaments turned out BEAUTIFUL!! I'm totally mad at myself for not taking more pictures of everyone's individual ornaments...but here is one of our little creations made by Moriah...

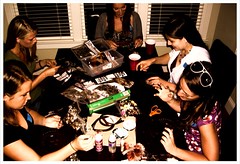
Some snap shots of us working away on our ornaments...
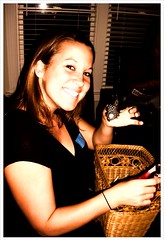
All finished!

Next we had a little Dirty Santa gift exchange. The goal was to bring something hand-made, or craft inspired. It's not often that crafters actually receive something crafty...ha.


We cannot say enough how much we TRULY enjoyed our time together last night! Can't wait to see what we craft next year!! If you're interested in coming to Craft Night, shoot an email to jilllouisehickman@gmail.com and we'll get you added to that list!


Merry Christmas and Happy Holidays Everyone!!!

Wednesday, November 4, 2009

Craft Night #3 - Embroidery

Another successful craft night was had by all...last night we learned to embroider. We used iron-on patterns on various items and did some hand-stitching! This is a great, fun, quick project to make lovely gifts for people. Some of us embroidered on tea towels and table cloths. Moriah stitched on a cute tote bag and Katie is making a perpetual calendar by sewing the month names on various types of fabric.

We used patterns from Sublime Stitching, a really cool, updated collection of iron-on patterns. You just transfer these to your fabric and stitch away! Here's another fun resource for vintage patterns on Flickr, Hoop Love. Jill also supplied us with a great book, Doodle Stitching, detailing the various embroidery stitches. Most of us used back stitch and slip stitch to create nice solid outlines on our designs.
Kristen and Charisse joined us for the first time and we were happy to have them! I think they had a fun time and will be coming back. Thanks to Jenny, Moriah, and Katie for some yummy treats to munch on while we worked.We thought of many different projects you could embroider on for gifts: a pincushion, a pillowcase, tote bags, knitting project bags, and you can also embroider on a piece of fabric and use your cute wooden hoop to frame it in (just trim the excess fabric away and glue the hoop down to your fabric!)

Here are the supplies you'll need if you want to stitch along too:
-embroidery needle
-a few colors of DMC floss (the kind you used to make friendship bracelets with!)
-a hoop (match the size of this to the size of the pattern you want to do and/or the size of what you're stitching on)
-an iron-on pattern or a printed pattern and some transfer paper
-a fabric pen that is water soluble (if you want to draw your own designs!)

It's a nice in-expensive hobby and so much fun!
We sure missed Jill this time and hope she gets better soon! It wasn't the same without you Jill!

Our next Craft Night will be December 1st. We'll be making something to put us into the holiday spirit and will be doing a crafty gift-exchange, so stay tuned!

Happy Crafting,
Laura

Wednesday, October 7, 2009

Craft night...take TWO!

Yay for another successful craft night! Thanks to all you lovely ladies who showed up! For those of you who weren't able to make it, you missed out on crocheting, coasters, and yummy pumpkin chip muffins...

happy crocheters...


more happy crocheters...


pups snuggling up to their new best friends!


laura helping katie get with stitches...


finished project...It's a coaster!

I think we've all developed a new love crocheting! Below is the pattern that most of us worked on if you'd like to try one yourself...

Coasters measure 5 1/2" x 5 1/2".

Crème de la Crème™: One 2 (2 1/2) ounce ball makes 5 (6)
coasters.

Crochet Hook: 5mm [US H-8].

GAUGE: Rnds 1-2 = 2 3/4" across. Use any size hook to
obtain the gauge.

Foundation: Ch 5, Join with slip stich to 5th ch from hook to make ring

Rnd 1: Ch 4; 11 dc in 4th ch from hook; join with a sl st to top of beg ch – 12 sts.

Rnd 2: Ch 3, dc in joining, 2 dc in each st around; join.
Rnd 3: Ch 3, 2 dc in joining, ch 1, skip next st, [3dc in next st, ch 1, skip next st] 11 times; join.

Rnd 4: Ch 1, sc in the next dc, (2 dc, ch1, 2 dc) all in sp * sc in next 2 dc, (2 dc, ch1, 2 dc) all in ch 1 space* repeat 11 times; join to first sc

Fasten off. Weave in ends.

ABBREVIATIONS: ch = chain; dc = double crochet; mm = millimeters; sc
= single crochet; sl = slip; st = stitch; [ ] = work directions in brackets the
number of times specified..

And if you'd like to make the yummy pumpkin chip muffins we all scarfed down...try this recipe!


Pumpkin Chocolate Chip Muffins

Ingredients:
1 2/3 c Flour
1 c Sugar
1/4 t Salt
1 t Pumpkin Pie Spice
2 Eggs
1 c Pumpkin (not Pumpkin Pie mix!)
1/2 c Melted Butter
6 oz Chocolate Chips

Mix flour, sugar, salt, and pumpkin pie spice in a medium size bowl, then mix in eggs, pumpkin, melted butter, and chocolate chips.

Spoon muffin batter into muffin pans 3/4 of the way full.

Bake at 350 degrees for 20 min for regular muffins, or 16 - 18 min for mini-muffins (do not over bake!)

That about covers craft night! Our next night will be Tuesday, November 3...We hope you can make it!
Happy Crafting,
Jill & Laura

Friday, September 4, 2009

Craft Night Take One


Craft Night Take One
Originally uploaded by elletrain
Happy Friday everyone! Our first Craft Nashy Craft Night last evening was a total success! Thanks to everyone who braved the Titans game traffic and came to participate! We had such a fun time, met new people, and made lovely hair accessories just in time for the weekend. :) Mattie and Kodi enjoyed craft night too! (See Mattie's smile at the bottom of the post!) It was so great to see everyone's creativity at work...I know you're jealous of these gorgeous pieces we made!

Well, you don't have to be jealous for long. Here are some instructions on making your own at home. I found all of these supplies at Joann's and CVS:

Supplies:
-headband/hair clip
-feathers
-hot glue gun
-waxed paper
-Alene's Clear Tacky Glue
-buttons
-ribbon (it's good to get some the same width of your headbands)
-felt
-felt glue

*There's no right or wrong way to do this!

Option 1: Clip small feathers away from their fluffy parts and glue them in an overlapping fashion across the whole headband.

Option 2: Collect a cluster of feathers, lay them on the waxed paper and glue them at the tips with a small glob of hot glue. Then you can apply this cluster to the side of the headband, wrapping the glob of glue in ribbon to hide it. It's nice to put a button at the "center" of the cluster to add a nice detail.

Option 3: Open the hair clip and cover the top part with a small piece of felt, just the size of the clip. Create another cluster of feathers and apply it to the felt with the felt glue. Again, you can add a button to center the design.

There are many more options that all you creative folks can come up with! Someone suggested making a hairpiece and adding the black netting like you see in vintage pieces. I think that would be adorable. The sky's the limit. There are many stores that sell items like this if you need inspiration. MarthaStewart.com also has a project they title "Fashion Headbands" if you need additional ideas. Have fun making your new accessories! Hope you can join us for the next craft night in October. Thanks again to everyone who came and made this first event a great success! xoxo

Tuesday, September 1, 2009

Monthly Craft Night Take 1

Here is just a sample of what we'll be making this Thursday for our first craft night! This headband was super simple, but also super inexpensive to make! We'll also be making hair clips that are a little more involved, but I just thought I'd post this as something to get that creativity flowing. See you Thursday!

Thursday, August 27, 2009

Welcome to Craft Nashy!


Hi out there...this is a blog dedicated to our upcoming Monthly Craft Night here in Nashville, TN. Our first event is next Thursday and we plan to meet once a month to get together for crafting. Our projects will vary from jewelry and accessories to home decor to gifts. Jill (ohmyjustdandy.blogspot.com) and I (elletrainknits.blogspot.com) enjoy blogging about and reading through craft blogs. We were inspired to start this monthly craft night due to all of the lovely ideas we get on the blogs we read.

In addition to being a blog dedicated to photos and fun from our craft nights, I also intend to post information about the various craft projects we do each month. Bear with us as we get this thing started, but you will soon be able to craft along with us and see some great ideas to make at home, whether you live here and have to miss out one month or whether you stumble upon this blog online and see something you like. I hope you will be inspired as we inspire each other every month! See you soon for our first post next week.